unlisted: true
Deploying a Next.js App on Cloudflare Pages
WARNING: Cloudflare Pages only supports Edge Runtime functions, not the full Node.js runtime.
The cloud router in this project requires a Node.js runtime for Supabase SDK, authentication, sync, and other server-side features that cannot run on Cloudflare's edge runtime.
Workaround: Step 3.4. has been added below, to DELETE the Node.js cloud router - which means that some parts of this application will not work.
- Side effects: Sharing functionality, import from ChatGPT share, and post to Paste.GG will not work
- Cloud features (sync, auth, payments) will not be available
- See Issue 174.
This guide provides steps to deploy your Next.js app on Cloudflare Pages. It is based on the official Cloudflare developer documentation, with some additional steps.
Step 1: Repository Forking
Fork the repository to your personal GitHub account.
Step 2: Linking Cloudflare Pages to Your GitHub Account
- Navigate to the Cloudflare Pages section and click on the
Create a projectbutton. - Click
Connect To Gitand grant Cloudflare Pages access to either all GitHub account repositories or selected repositories. We recommend using selected Repo access and selecting the forked repository from step 1.
Step 3: Configuring Build and Deployments
- After selecting the forked GitHub repository, click the Begin Setup button
- On this page, set your Project name, Production branch (e.g., main), and your Build settings
- Choose
Next.jsfrom the Framework preset dropdown menu - Set a custom Build Command:
rm app/api/cloud/[trpc]/route.ts && npx @cloudflare/next-on-pages@1- see the tradeoffs for this deletion on the notice at the top
- Keep the Build output directory as default
- Click the Save and Deploy button
Step 4: Monitoring the Deployment Process
Observe the process as it initializes your build environment, clones the GitHub repository, builds the application, and deploys it to the Cloudflare Network. Once complete, proceed to the project you created.
Step 5: Required: Set the nodejs_compat compatibility flag
- Navigate to the Settings > Functions page of your newly created project
- Scroll to
Compatibility flagsand enter "nodejs_compat" for both Production and Preview environments. It should look like this: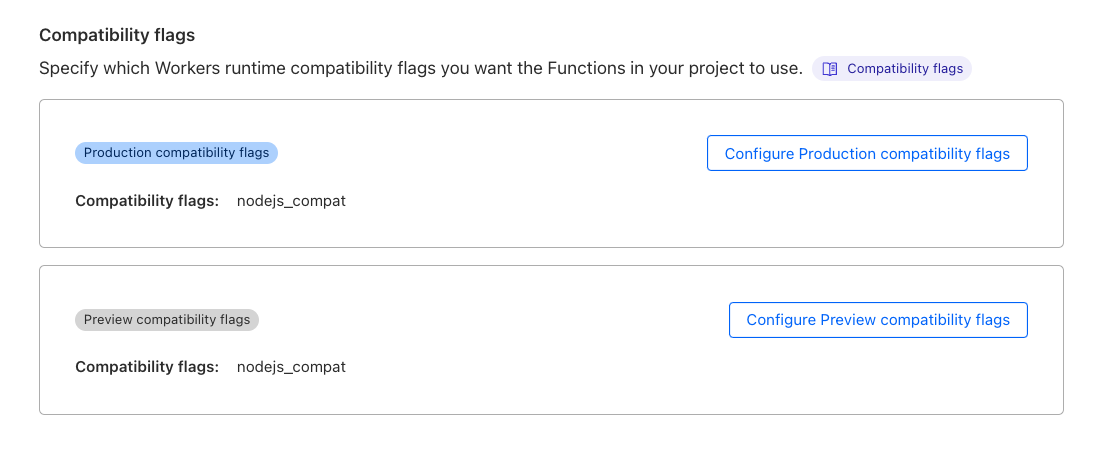
- Re-deploy your project for the new flags to take effect
Step 6: (Optional) Custom Domain Configuration
Use the Custom domains tab to set up your domain via CNAME.
Step 7: (Optional) Access Policy and Web Analytics Configuration
Navigate to the Settings page and enable the following settings:
- Access Policy: Restrict preview deployments
to members of your Cloudflare account via one-time pin and restrict primary
*.YOURPROJECT.pages.devdomain. Refer to Cloudflare Pages known issues for more details. - Enable Web Analytics.
Congratulations! You have successfully deployed your Next.js app on Cloudflare Pages.
BIG-AGI
Resources
© 2026 Token Fabrics·Built with passion in San Diego