Configuring Azure OpenAI Service with big-AGI
The entire procedure takes about 5 minutes and involves creating an Azure account,
setting up the Azure OpenAI service, deploying models, and configuring big-AGI
to access these models.
Please note that Azure operates on a 'pay-as-you-go' pricing model and requires credit card information tied to a 'subscription' to the Azure service.
Configuring big-AGI
If you have an API Endpoint and API Key, you can configure big-AGI as follows:
- Launch the
big-AGIapplication - Go to the Models settings
- Add a Vendor and select Azure OpenAI
- Enter the Endpoint (e.g., 'https://your-resource-name.openai.azure.com')
- Enter the API Key (e.g., 'fd5...........................ba')
The deployed models are now available in the application. If you don't have a configured Azure OpenAI service instance, continue with the next section.
In addition to using the UI, configuration can also be done using environment variables.
Server Configuration
For server deployments, set these environment variables:
AZURE_OPENAI_API_ENDPOINT=https://your-resource-name.openai.azure.com
AZURE_OPENAI_API_KEY=your-api-key
This enables Azure OpenAI for all users without requiring individual API keys. For more details, see environment-variables.md.
Azure OpenAI API Versions
Azure OpenAI supports both traditional deployment-based API and the next-generation v1 API:
Next-Generation v1 API (Default)
- Enabled by default for GPT-5-like models (GPT-5, GPT-6, o3, o4, etc.)
- Uses direct
/openai/v1/responsesendpoint without deployment IDs - Optimized for advanced reasoning models and new features
- Can be disabled by setting
AZURE_OPENAI_DISABLE_V1=true
Traditional Deployment-Based API
- Uses
/openai/deployments/{deployment-name}/...endpoints - Required for older models and when v1 API is disabled
- Needs deployment ID for all API calls
Known Limitations
- Web Search Tool: Azure OpenAI does not support the
web_search_previewtool that's available in OpenAI's API - Models with web search capabilities will have this feature automatically disabled on Azure
Setting Up Azure
Step 1: Azure Account & Subscription
- Create an account on azure.microsoft.com
- Go to the Azure Portal
- Click on Create a resource in the top left corner
- Search for Subscription and select Create Subscription
- Fill in the required fields and click on Create
- Note down the Subscription ID (e.g.,
12345678-1234-1234-1234-123456789012)
Step 2: Create Azure OpenAI Resource
For more information, see Azure: Create and deploy OpenAI
- Click on Create a resource in the top left corner
- Search for OpenAI and select Create OpenAI
- Fill in the necessary fields on the Create OpenAI page
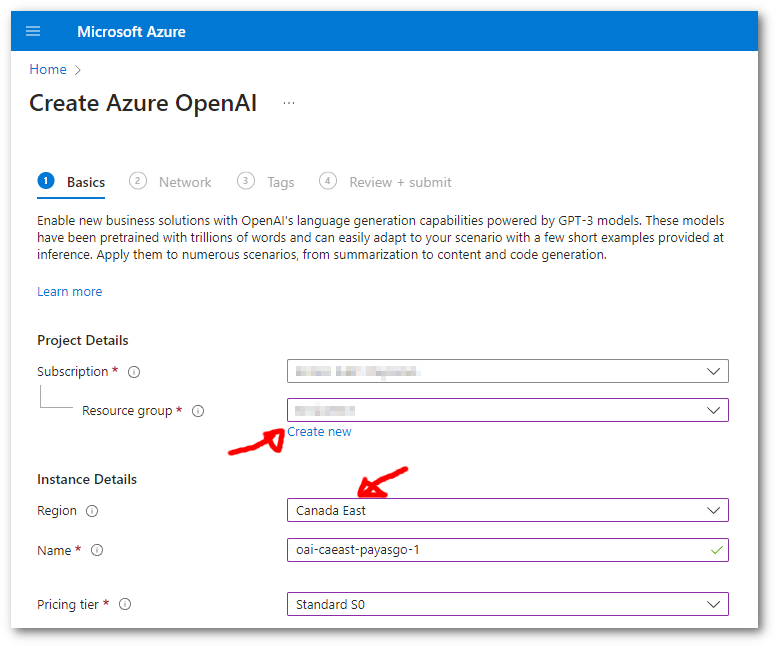
- Select the subscription
- Select a resource group or create a new one
- Select the region. Important: The region determines which models are available.
Popular regions like East US, West Europe, and Australia East typically have the best model availability. For the latest model availability by region, see Azure OpenAI Model Availability
- Name the service (e.g.,
your-openai-api-1234) - Select a pricing tier (e.g.,
S0for standard) - Select: "All networks, including the internet, can access this resource."
- Click on Review + create and then Create
After creating the resource, you can access the API Keys and Endpoints:
- Click on Go to resource (or navigate to your Azure OpenAI resource)
- In the left sidebar, under Resource Management, click on Keys and Endpoint
- Copy the required information:
- Endpoint: e.g., 'https://your-resource-name.openai.azure.com/'
- Key: Copy either KEY 1 or KEY 2 (both work identically)
Step 3: Deploy Models
By default, Azure OpenAI resource instances don't have models available. You need to deploy the models you want to use.
- In your Azure OpenAI resource, click on Model deployments in the left sidebar
- Click on Create new deployment
- Fill in the deployment details:
- Select a model: Choose from available models
- Model version: Select the latest version or a specific one
- Deployment name: Give it a meaningful name
- Click Deploy
Repeat as necessary for each model you want to deploy.
Resources
BIG-AGI
Resources
© 2026 Token Fabrics·Built with passion in San Diego